This blog is now retired. While Blogger makes posting easy, I am currently looking for something that enables me to write in Markdown. Also, "applying R" is no longer a good description of my work.
To be continued... somewhere else.
Thursday, October 11, 2018
Friday, May 12, 2017
Buy Your Mother a Domain for a Mother's Day (GoDaddy Domain for GitHub Pages)
Mother's Day is coming. Flowers and chocolate are nice and all. But if you want to surprise your mother with something less traditional, you can register her a domain and add Github Page as a gift.
I have registered simecek.xyz domain a long time ago. Yesterday I discovered it is really easy to connect it to Github Page or blog.
I have registered simecek.xyz domain a long time ago. Yesterday I discovered it is really easy to connect it to Github Page or blog.
- GitHub:
In a repository with your Github Pages, create a file CNAME and write your domain address in it (e.g. "simecek.xyz") - GoDaddy:
Find DNS setting for your domain. GoDaddy is changing web interface all the time but it should look something like this
You need to change two values: "A" should be 192.30.252.153 and CNAME www should be your Github Page's URL (e.g. GITHUB_USER_NAME.github.io).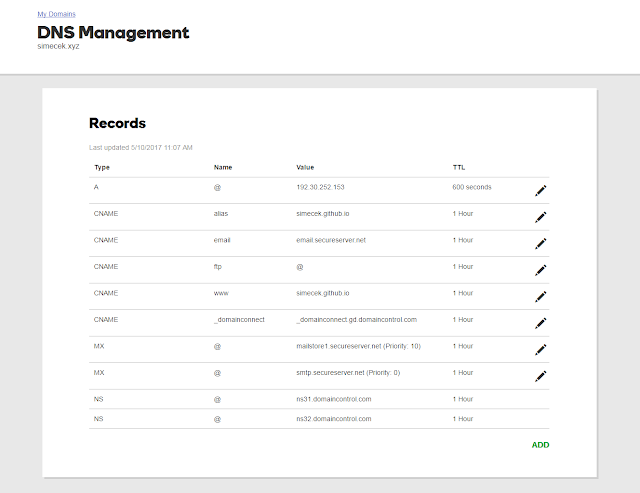
DNS Settings for your domain

Wednesday, April 26, 2017
Making your plots interactive - update
Two years ago I have been experimenting with Shiny and interactive plots and I have published here a post that remains to be one of the most read pages of this blog. I feel guilty about it because I was wrong about almost everything. A few weeks later, the free use of shinyapps.io was over. Meanwhile, plotly package, I did not appreciate that time so much, has matured and added more R functionality.
If you are into ggplot2, it is now super-easy to add interactivity to your graph. Just take your static ggplot object pl like the following
and run
library(plotly)
ggplotly(pl)
That's it. You can configure your tooltip text with ggplotly(pl, tooltip = "text"), see my Rmarkdown example. And it works not only for a simple scatterplot but for more complex graphs as well, as @cpsievert tweeted today.
There are now also many easy-to-use htmlwidgets. And with the ggiraph package, you get now your click as Shiny input.
If you are into ggplot2, it is now super-easy to add interactivity to your graph. Just take your static ggplot object pl like the following
 |
| mpg dataset |
library(plotly)
ggplotly(pl)
That's it. You can configure your tooltip text with ggplotly(pl, tooltip = "text"), see my Rmarkdown example. And it works not only for a simple scatterplot but for more complex graphs as well, as @cpsievert tweeted today.
I made @galka_max Europe map interactive with 2 more lines of #rstats code https://t.co/KZp0w5YoFH pic.twitter.com/a4GaFJRJVn— Carson Sievert (@cpsievert) April 26, 2017
There are now also many easy-to-use htmlwidgets. And with the ggiraph package, you get now your click as Shiny input.
Tuesday, January 31, 2017
Blogging from RStudio with blogdown package
In my previous post, I described how to make a simple personal Github page with Jekyll. You can blog in R/Markwown this way, you just need to ask rmarkdown to keep .md files and push them (with images and other assets) to Github.
The blogdown package automates this process and open the resulting page in RStudio viewer. You just provide .Rmd files and any time you make a change, blogdown crunches all the R chunks, generates .md files and uses pandoc to translate them into HTML pages.
I am going to use it mainly for code snippets that are too short for this blog but too long for a tweet. Plus I do not wish to forget them. See my blogdown blog on the first figure. Here, I will provide a step-by-step guide how to create a similar one.
Do not create the "README" or "LICENCE" file. If you did, just delete it because blogdown requires to start with an empty directory and throws a message "Warning message: In blogdown::new_site() : The directory '.' is not empty" otherwise.
After that you might need to install HUGO, a platform that blogdown stands on, with blogdown::install_hugo(). Finally, a skeleton of a new blog can be generated by blogdown::new_site().
You might also want to add the links to your Twitter, Github... accounts, maybe even Google Analytics and Disqus. For Disqus, I did not manage to use a default template and was forced to create my own version of footer. Solved - see Update.
Finally, call blogdown::serve_site() and view the blog. Any change you do immediately propagates into your RStudio viewer.
If you do not like the default look, you can choose and customize a theme from Hugo Theme gallery (use blogdown::install_theme function).
Next, you need to tell Github where to look for your Github pages. In the repo "Settings" (http://github.com/USERNAME/BLOGNAME/settings), find "GitHub Pages -> Source", select "master branch /docs folder" and push the "Save" button.
To add content use either new_post() function or RStudio add-in "New post" as shown on a figure below. Use format "R Markdown" if your post contains R code that needs to be run and "Markdown" otherwise. If you are new to markdown, Help -> Markdown quick reference (from RStudio menu) contains a lot of useful tips.
UPDATE 2/1/2016: Regarding Disqus problem: it is caused by blogdown::serve_site() function that ignores some settings in config.toml file, namely baseurl option. If you want to use Disqus, set URL of your blog to baseurl and run blogdown::build_site(local=FALSE) just before committing and pushing changes to Github. See build_site() help for more information.
The blogdown package automates this process and open the resulting page in RStudio viewer. You just provide .Rmd files and any time you make a change, blogdown crunches all the R chunks, generates .md files and uses pandoc to translate them into HTML pages.
I am going to use it mainly for code snippets that are too short for this blog but too long for a tweet. Plus I do not wish to forget them. See my blogdown blog on the first figure. Here, I will provide a step-by-step guide how to create a similar one.
 |
| My blogdown blog at http://simecek.github.io/blog |
1) Create a Github repository:
Go to your Github account, click the big green button "New Repository" and name your blog (it will later appear at http://USERNAME.github.io/BLOGNAME where BLOGNAME is a name of your repository).Do not create the "README" or "LICENCE" file. If you did, just delete it because blogdown requires to start with an empty directory and throws a message "Warning message: In blogdown::new_site() : The directory '.' is not empty" otherwise.
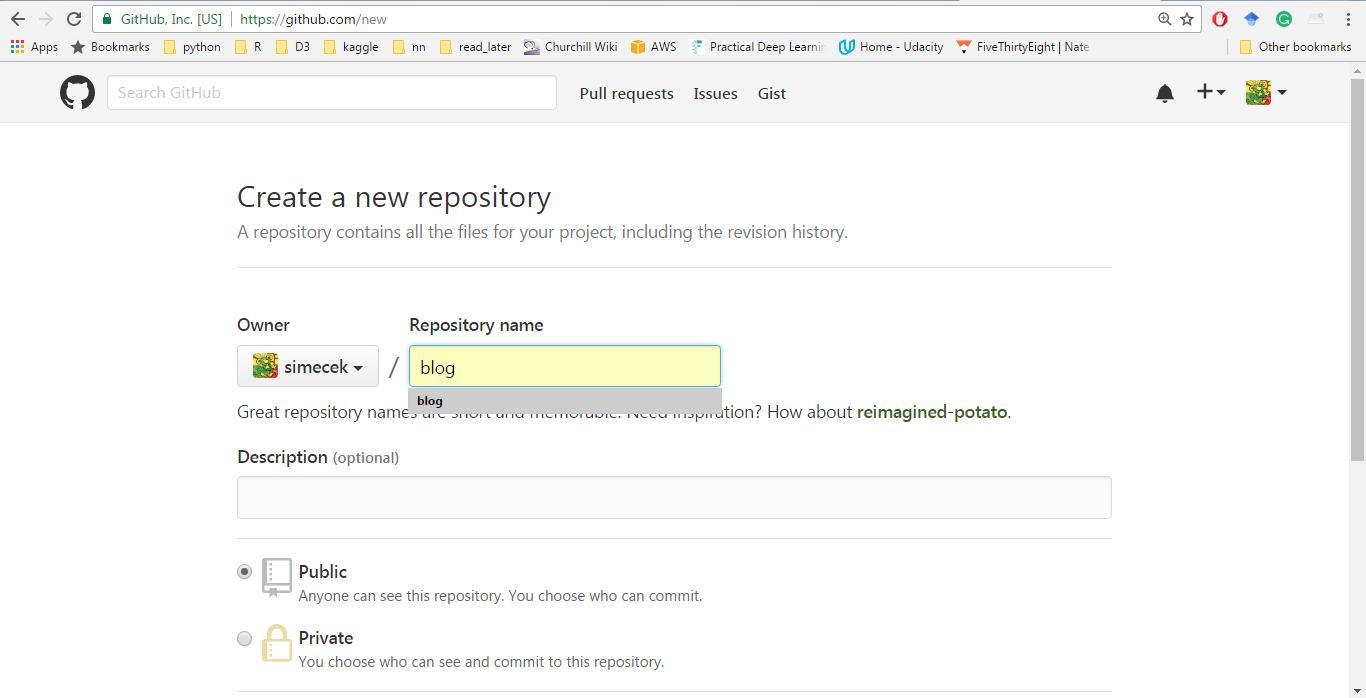 |
| New repository |
2) Create RStudio Project:
Open RStudio, select File -> New Project -> Version Control -> Git. Copy URL address from your browser (http://github.com/USERNAME/BLOGNAME) into Repository URL field. Click "Create Project" button. |
| New RStudio project |
3) Install blogdown and create an empty skeleton
You can install blogdown from Github with devtools:devtools::install_github('rstudio/blogdown')
After that you might need to install HUGO, a platform that blogdown stands on, with blogdown::install_hugo(). Finally, a skeleton of a new blog can be generated by blogdown::new_site().
4) Customize config.toml file
Open the file "config.toml" and add a new line with publishDir = "docs" (preferably somewhere at the beginning of the file). This makes your HTML page to be generated into "./docs" folder and setting of your Github Pages will be later much easier. If you prefer hard ways, Amber Thomas and Jente Hidskes describe how to keep default "publishDir" and push the "./public" folder into a branch with git subtree.You might also want to add the links to your Twitter, Github... accounts, maybe even Google Analytics and Disqus.
Finally, call blogdown::serve_site() and view the blog. Any change you do immediately propagates into your RStudio viewer.
If you do not like the default look, you can choose and customize a theme from Hugo Theme gallery (use blogdown::install_theme function).
5) Commit Changes, Push Them to Github and Github Page Setting
Finally, go into your RStudio "Git" panel, select all files and commit them with and an appropriate message ("initial commit of my first blogdown blog, hurray!"). Of course, if you prefer git in a terminal to RStudio "Git" panel, you can commit and push to Github from a command line (git push -u origin master).Next, you need to tell Github where to look for your Github pages. In the repo "Settings" (http://github.com/USERNAME/BLOGNAME/settings), find "GitHub Pages -> Source", select "master branch /docs folder" and push the "Save" button.
 |
| Setting Github Pages |
6) Adding a content
Finally, your blog is online. You can access it at http://USERNAME.github.io/BLOGNAME.To add content use either new_post() function or RStudio add-in "New post" as shown on a figure below. Use format "R Markdown" if your post contains R code that needs to be run and "Markdown" otherwise. If you are new to markdown, Help -> Markdown quick reference (from RStudio menu) contains a lot of useful tips.
 |
| New post addin |
UPDATE 2/1/2016: Regarding Disqus problem: it is caused by blogdown::serve_site() function that ignores some settings in config.toml file, namely baseurl option. If you want to use Disqus, set URL of your blog to baseurl and run blogdown::build_site(local=FALSE) just before committing and pushing changes to Github. See build_site() help for more information.
Thursday, January 26, 2017
Simple Personal Github Page (with Jekyll)
I remember when I was creating my first Github Page. I was still quite new to git, did not understand branches and I was lost in Jekyll configuration. This step-by-step guide is intended for people in such situation that are, however, users of a) Github b) RStudio (if not, read this).
1. Create Github Repository
Go to your Github account and click the big green button "New Repository", name your new repository USERNAME.github.io (for example simecek.github.io).
 |
| New Github repo |
2. Create RStudio Project
Open RStudio, select File -> New Project -> Version Control -> Git. Copy URL address from your browser (http://github.com/USERNAME/USERNAME.github.io) into Repository URL field (see figure below). Click "Create Project" button.
 |
| New version controlled project |
Locate the folder (USERNAME.github.io) on a disk. You will need it in the following step.
3. Select and Customize Jekyll Template
If you wish, you can use any static web page as your Github Page. For example, you can just have a redirecting script. Here, I will show how to build a simple landing page with Jekyll.
First of all, select a template you want to use, for example from http://jekyllthemes.org/.
 |
| Jekyll Themes gallery |
Save and extract template ZIP file into your RStudio project folder USERNAME.github.io, so it should now look something like this (the folder on a disk, NOT yet Github repository).
Read extracted README file. Typically, you need to customize _config.yml and index.html files. The page itself is generated by Jekyll (ruby gem). Github supports Jekyll, so you might let generation of the actual HTML pages on him.
4. Commit Changes and Push Them to Github
Finally, go into your RStudio "Git" panel, select all files and commit them with and an appropriate message ("initial commit of my first Github Page, hurray!").
 |
| Git panel is just next to Environment and History |
You might want to check that Github Pages are turned on in your repo's setting (https://github.com/USERNAME/USERNAME.github.io/settings). You might need to wait for a minute or two before the page is generated. Do not like it? Modify - commit - push (- make a tea - rinse - and repeat).
Thursday, July 14, 2016
One more reason to use Feather
It was quiet here for some time. Not because I have nothing to blog but because I have no time to do so properly. One of those almost forgotten posts was about Feather package / module.
Feather is a fast, lightweight binary format for data frames with R and Python implementation. The original RStudio announcement is here. And sure, the speed improvement is impressive. See my numbers for saving ~ 100 million probabilities:
Feather is even better if you compare it to traditional text formats like CSV. As David Smith explains in his blog, one of the reasons is traditional formats are row-oriented while internal R's storage is column-oriented.
I have one more reason to use Feather. If you have datasets with many columns (e.g. genes in human/mouse genome) and you need fast access to just one column (e.g. Shiny app), then Feather is ideal because its columns are automatically indexed.
Sure, there are other solutions, like rhdf5 or RSQLite, but Feather is the easiest to use, at least for me, at least in R. See David Smith (Microsoft R) for more details: http://blog.revolutionanalytics.com/2016/05/feather-package.html
Feather is a fast, lightweight binary format for data frames with R and Python implementation. The original RStudio announcement is here. And sure, the speed improvement is impressive. See my numbers for saving ~ 100 million probabilities:
# haplotype probs: 192 animals x 8 x 64000 markers
> format(object.size(probs), units="Mb")
[1] "750 Mb"
# saveRDS or save needs almost a minute to write probs to disk
> system.time(saveRDS(dprobs, file="DO192_probs.rds"))
user system elapsed
50.701 0.574 51.678
# write_feather needs 6-7 seconds
> system.time(write_feather(dprobs, file="DO192_probs.feather"))
user system elapsed
1.344 1.051 6.272
1.344 1.051 6.272
Feather is even better if you compare it to traditional text formats like CSV. As David Smith explains in his blog, one of the reasons is traditional formats are row-oriented while internal R's storage is column-oriented.
 |
| Diagram credit: Hadley Wickham |
I have one more reason to use Feather. If you have datasets with many columns (e.g. genes in human/mouse genome) and you need fast access to just one column (e.g. Shiny app), then Feather is ideal because its columns are automatically indexed.
read_feather("DO192_probs.feather",
column = "19_48310898")
user system elapsed
0.068 0.000 0.069Sure, there are other solutions, like rhdf5 or RSQLite, but Feather is the easiest to use, at least for me, at least in R. See David Smith (Microsoft R) for more details: http://blog.revolutionanalytics.com/2016/05/feather-package.html
Wednesday, May 20, 2015
Teaching R course? Use analogsea to run your customized RStudio in Digital Ocean!
Two years ago I taught an introductory R/Shiny course here at The Jackson Lab. We all learnt a lot. Unfortunately not about Shiny itself, but rather about incompatibilities between its versions and trouble with its installation to some machines.
And it is not only my experience. If you look into forums of Rafael Irizarry MOOC courses, so many questions are just about installation / incompatibilities of R packages. The solution exists for a long time: run your R in a cloud. However, customization of virtual machines (like Amazon EC2) used to be a nontrivial task.
In this post I will show how a few lines of R code can start a customized RStudio docklet in a cloud and email login credentials to course participants. So, the participant do not need to install R and the required packages. Moreover, it is guaranteed they all run exactly the same software. All they need is a decent web browser to access RStudio server.
 |
| RStudio server login |
Running RStudio in Digital Ocean with R/analogsea
So how complicated is it today to start your RStudio on clouds? It is (almost) a one-liner:- If you do not have Digital Ocean account, get one. You should receive a promotional credit $10 (= 1 regular machine running without interruption for 1 month):
https://www.digitalocean.com/
(full disclosure: if you create your account using the link above I might get an extra credit) - Install analogsea package from Github. Make sure to create Digital Ocean personal access token and in R set DO_PAT environment variable. Also create your personal SSH key and upload it to Digital Ocean.
- And now it is really easy:
library(analogsea)
# Sys.setenv(DO_PAT = "*****") set access token
# start your machine in Digital Ocean
d <- docklet_create(size = getOption("do_size", "512mb"))
# run RStudio on machine 'd' (rocker/rstudio docker image)
d %>% docklet_rstudio()
It will cost you ~$0.01 per hour ($5 per month, May 2015). When you are done, do not forget to stop your Digital Ocean machine (droplet_delete(d)). At the end, make sure that you successfully killed all your machines - either log in to Digital Ocean or by calling droplets() in R.
Wednesday, February 11, 2015
Make your R plots interactive
THIS POST IS NOW OBSOLETE, USE PLOTLY OR GGIRAPH, SEE MY CODE EXAMPLE
As a part of my daily job, I draw scatterplots, lots of them. And because there are thousands of genes expressed in any mouse or human tissue, my typical plot looks something like this (code). (Actually, it is a comparison of variance that can be attributed to "sex" factor in mRNA vs. protein expression.)

The question is - what is a gene in the top right corner? And what is the one next to him? And this one? And that?
Wednesday, November 5, 2014
Tweeting at #IMGC14 conference
The 28th annual International Mammalian Genome Conference was held over the last week in Bar Harbor, MA. For the first time, the official conference hashtag #IMGC14 was introduced. Twitter shares plummeted 9% next day. Pure coincide? I do not think so!
Totally, 79 participants contributed 1546 tweets. Guess who was the Twitter evangelist?

The distribution of tweets in time reveals when the lobster was served as a conference dinner.
Totally, 79 participants contributed 1546 tweets. Guess who was the Twitter evangelist?
The distribution of tweets in time reveals when the lobster was served as a conference dinner.
Tuesday, May 13, 2014
RStudio: Pushing to Github with ssh-authentication
If RStudio prompts you for a username and password every time you try to push your project to Github, open the shell (Git menu: More/Shel...) and do the following:
1) Set username and email (if you did not do that before)
2) Create SSH key
In RStudio, go to menu Tools / Global options / Git SVN / View public key and copy the key to your Github account setting (Edit profile / SSH keys / Add SSH key).
To check that ssh-authentication works, try to run
and you should get something like
Hi your_username! You've successfully authenticated, but GitHub does not provide shell access.
3) Change remote.origin.url from HTTPS to HTTP
It might be Windows specific, but after 1)+2) RStudio still asks me for user name and password. After a long Google search, I have found a solution here and that is
Hip, Hip, Hurrah!

If it was trivial for you, I do apologize. I am still very bad in guessing what could be useful for somebody and what not so much. That is why I have this blog and Github account in the first place.
One example, last year I published a paper in JSPI journal that improves a test for interaction in some very specific 2-way ANOVA situation (just one observation per group). The paper submission was an odyssey, mostly because of me. In one moment I doubted whether to retract the paper or not and I even did not upload the package to CRAN at first, just put it on Github.
Then I discovered that some guys found it and had built their package using it. They presented the results at UseR! 2013 conference. I might have met one of those biologists but I am sure I never mentioned my package to them. Finally, - and this is a bit embarrassing - I received an email from Fernando Tusell that I misspelled his name in one of my functions.
In summary, even if you see your work as non-essential from your perceptive, the others may have different view. Just do your best and share your results. Github is a perfect place for this.
1) Set username and email (if you did not do that before)
git config --global user.name "your_username"
git config --global user.email "your_email@example.com"
ssh-keygen -t rsa -C "your_email@example.com"
In RStudio, go to menu Tools / Global options / Git SVN / View public key and copy the key to your Github account setting (Edit profile / SSH keys / Add SSH key).
ssh -T git@github.comand you should get something like
Hi your_username! You've successfully authenticated, but GitHub does not provide shell access.
3) Change remote.origin.url from HTTPS to HTTP
It might be Windows specific, but after 1)+2) RStudio still asks me for user name and password. After a long Google search, I have found a solution here and that is
git config remote.origin.url git@github.com:your_username/your_project.gitHip, Hip, Hurrah!
If it was trivial for you, I do apologize. I am still very bad in guessing what could be useful for somebody and what not so much. That is why I have this blog and Github account in the first place.
One example, last year I published a paper in JSPI journal that improves a test for interaction in some very specific 2-way ANOVA situation (just one observation per group). The paper submission was an odyssey, mostly because of me. In one moment I doubted whether to retract the paper or not and I even did not upload the package to CRAN at first, just put it on Github.
Then I discovered that some guys found it and had built their package using it. They presented the results at UseR! 2013 conference. I might have met one of those biologists but I am sure I never mentioned my package to them. Finally, - and this is a bit embarrassing - I received an email from Fernando Tusell that I misspelled his name in one of my functions.
In summary, even if you see your work as non-essential from your perceptive, the others may have different view. Just do your best and share your results. Github is a perfect place for this.
Subscribe to:
Posts (Atom)